
Preparing Sticker Artwork: A Practical Print-Ready File Guide
Oct 11, 2026
What if a sticker file that looks finished on screen still needs changes before it’s ready to print? Preparing sticker artwork means checking more than the design: the finished size and shape, bleed, safe area, image resolution and colour setup all matter.
Cut lines and printed colours can be confusing, especially if it’s your first time preparing a file. A few practical checks can catch common issues before production, but artwork requirements can vary with the sticker’s shape and specification.
This guide explains how to set artwork to the intended finished size, keep important details clear of the trim edge and prepare images at 300 dpi at final size. You’ll also learn when a common 3 mm bleed is relevant, why CMYK is used for print, and what to include with your file. PDF is the preferred format for stickers and labels; JPG, JPEG, PNG, TIFF and ZIP are also accepted.
Key Takeaways
- Start with the sticker’s finished size and shape so the layout matches the result you want.
- When preparing sticker artwork, check any bleed requirement and keep important details safely inside the trim edge.
- Review image quality and colour settings before export to reduce avoidable print issues.
- Check the exported file, then send it in a preferred or accepted format.
- Include the sticker type, size, quantity, material or finish, deadline and collection preference with your print-ready file.
What makes sticker artwork print-ready? Start with the finished sticker
Print-ready artwork is prepared for the sticker’s intended finished size and the requirements of the print job. A design can look complete on screen yet leave important details unclear: the size and shape of each sticker, or the quantity required. Treat the artwork and order details as a matched set.
Decide the finished dimensions and shape before finalising the layout. These determine how much room is available for a logo, wording and other design elements, and give the print brief a clear reference. Printbox London (Same Day Printing London) produces custom sheet-based stickers and labels. When ordering, include the intended sticker size and shape with your artwork. For other photo services, see passport photos in London and American passport, visa and ID photos in London.
This guide focuses on preparing artwork and production details, rather than choosing materials or applying window stickers. The wider principles of print design help explain why a file needs to work in its final printed form, not just look right in a design programme.
Set the finished size before arranging the design
Build the design at the intended finished dimensions rather than on an arbitrary canvas. If you scale the layout later, the lettering and spacing change too. An image that looks sharp at a small size may lose clarity when enlarged. Check that the artwork dimensions refer to one sticker, not the full sheet around it. State the sheet size separately if it matters to your order.
Make the intended sticker shape clear
Make sure the layout suits the intended proportions. A wide logo may need a different arrangement from a circular badge; forcing either into another shape can crowd text or leave awkward gaps. Name the finished shape in the order details, for example, “round sticker” or “rectangle”, and provide its dimensions. Don’t assume the artwork alone makes the production requirements clear.
Keep the design separate from the instructions describing the order. The file shows what should appear on the sticker; the accompanying details should state the finished size, shape and quantity. This helps avoid confusing the sheet area with the size of one sticker. If you need the same design in more than one size or shape, identify each version clearly.
Label separate print jobs clearly, too. Sticker artwork has its own size and shape requirements, while other printed items need details suited to their intended use. Clear labels help prevent files and specifications being mixed up when you’re preparing several items for print.
Before sending the file, compare its layout with the sticker you want. Confirm that the dimensions describe one sticker, the shape is named in the order details, and any sheet area is identified separately. These checks give the print handover a clear starting point.
Set up sticker bleed, safe space and cut-line guidance
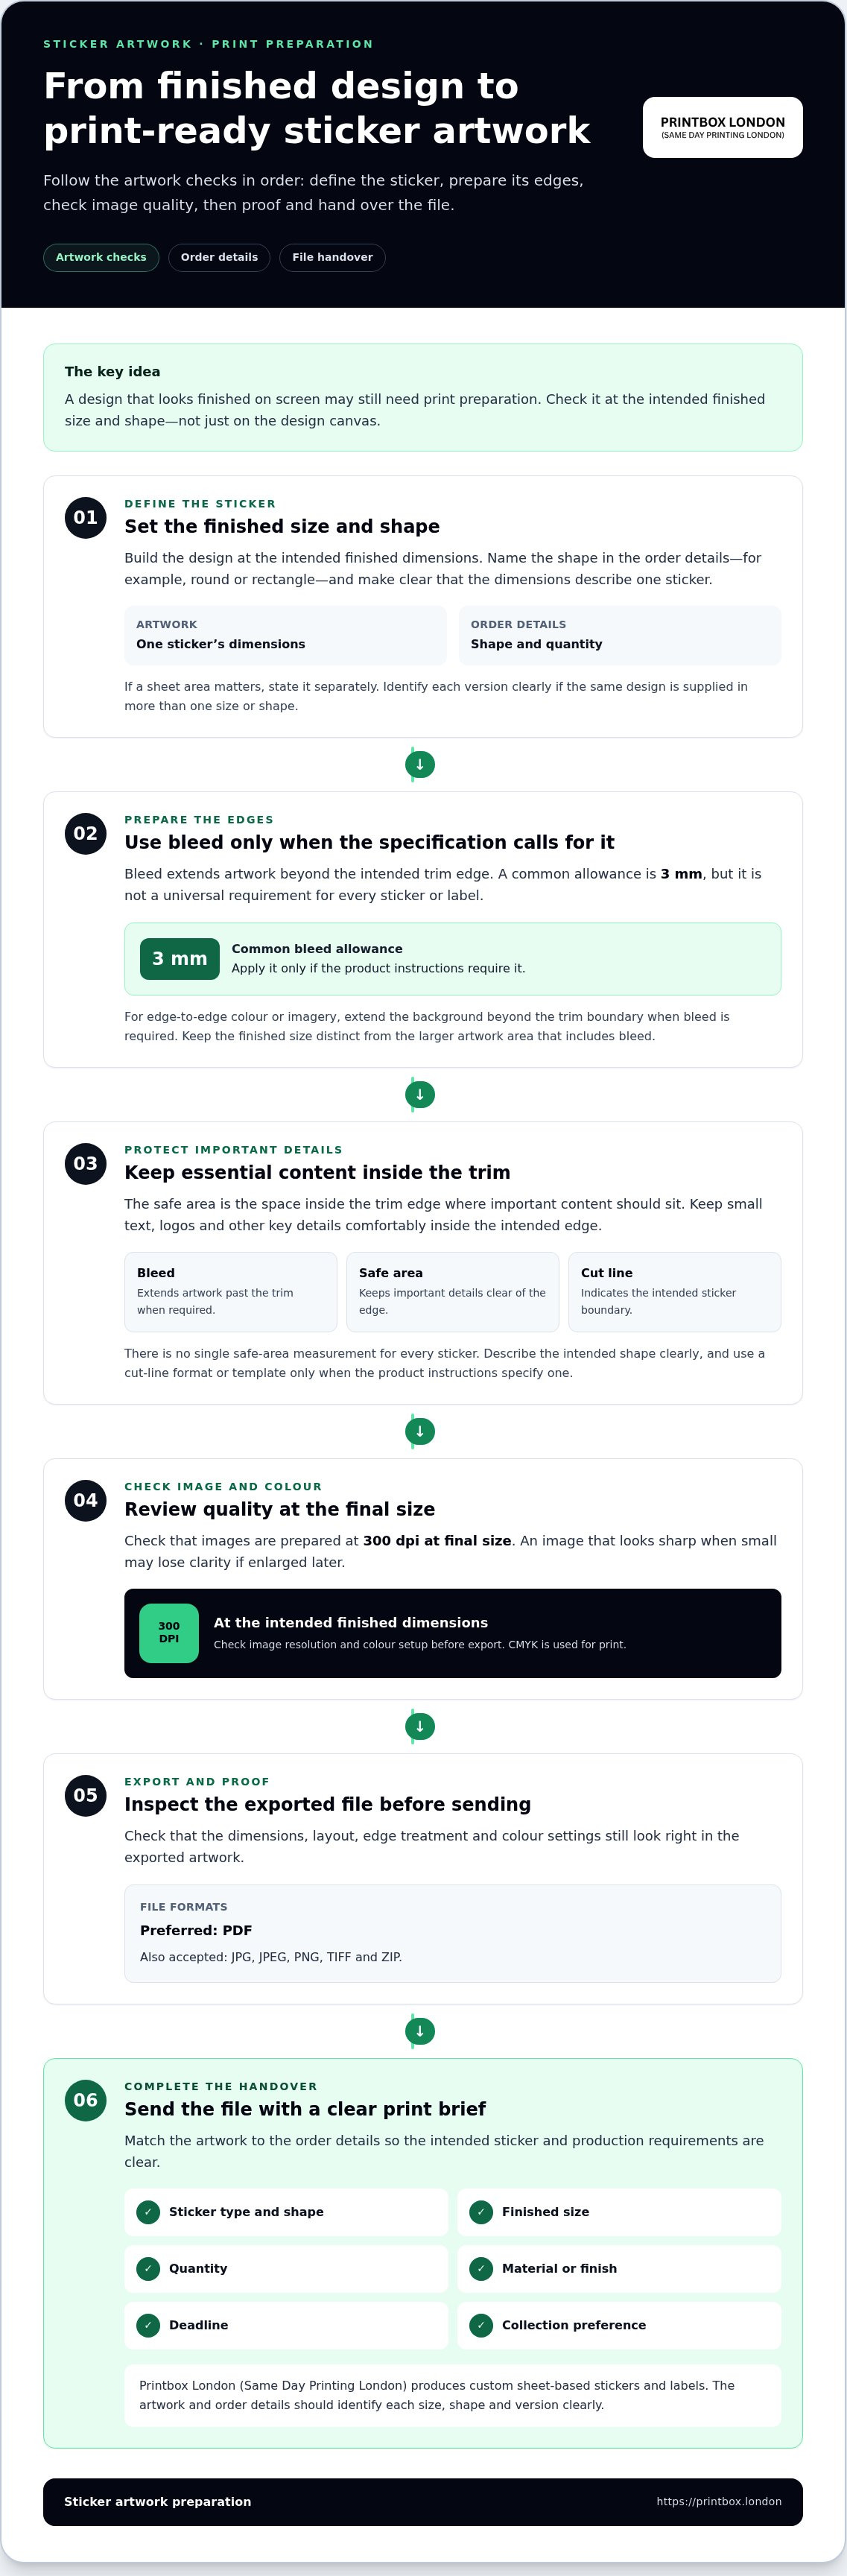
Sticker edges need clear instructions. Bleed is artwork that extends beyond the intended trim edge, helping prevent an unprinted sliver if the trim shifts slightly. The safe area is the space inside that edge where important content should sit. A cut line indicates the intended sticker boundary. These elements do different jobs: bleed extends the artwork, the safe area protects essential details, and cut-line guidance identifies where to cut.
A common bleed allowance is 3 mm, but this isn’t a universal requirement for every sticker or label. The right setup depends on the product specification, so don’t add the same amount automatically to every file. A background colour or image designed to run to the edge may need to extend beyond the trim boundary; a design with a white margin may not need the same treatment.
Add bleed only where the sticker specification requires it
Check the product instructions before setting up the file. If they call for 3 mm bleed, extend any edge-to-edge background or image into that allowance rather than stopping it at the intended trim edge. Keep the finished dimensions distinct from the larger artwork area that includes bleed. If bleed isn’t required, don’t enlarge the canvas without a reason.
For example, a coloured background intended to cover the entire sticker should continue past the edge where trimming will occur. If it ends exactly at that boundary, a slight difference in trim position could reveal a thin unprinted edge. The Types of Graphic Design overview includes print design as an area with production considerations. For sticker artwork, the practical step is to follow the file requirements for the specific job.
Keep essential content clear of trim edges
Place small text, logos and other important details comfortably inside the intended edge. There’s no single safe-area measurement for every sticker, so allow space according to the design and supplied specification. A visible border close to the edge can make small trim variations easier to notice. Keep it even and avoid placing it so tightly that a slight cut shift makes the design look unbalanced.
Preparing sticker artwork also means making the cutting instruction clear. A cut line marks the intended outline, especially for shapes other than a simple rectangle. Don’t assume that a coloured stroke or line in the design will automatically be read as a production instruction. State the intended shape in the order details, and use a cut-line format or template only when the product instructions specify one. Don’t assume a particular layer name or file format is required.
Before sending the file, check that the edge treatment matches the intended result: background coverage reaches the trim where needed, essential content sits safely inside it, and the cut boundary is clearly described. For custom sticker and label printing, Printbox London (Same Day Printing London) can produce stickers from artwork supplied with clear order details. If you’re unsure how bleed or cut guidance applies to your specification, get help with your sticker artwork.
Check sticker image resolution, colour and small details
A sticker design can be the right size and still print poorly if images are soft or details are too fine. Check the file at the size it will actually be printed, not only enlarged on a monitor. Raster images should target 300 dpi at final printed size, with CMYK colour and suitable bleed where relevant.
Use images that hold their detail at the finished size
DPI describes how much image detail is available across the printed dimensions. When a small image is stretched to fill a larger sticker, its pixels are spread over more space, so the effective resolution falls and edges may look blurred or jagged. Enlarging it in a design programme doesn’t create the missing detail.
Use the original image file where possible, rather than a screenshot or an image saved from a low-resolution preview. Before export, view the artwork at roughly its intended physical size. Inspect fine outlines, small icons and lettering within the image. If they already look indistinct at that scale, they’re unlikely to become clearer in print. Vector artwork can keep lines and shapes crisp when resized, but raster elements still need adequate resolution.
For example, a detailed logo copied from a small web preview may look acceptable when viewed at a distance on screen. At its finished sticker size, thin strokes or tiny lettering could merge or lose definition. Use a higher-quality original asset or simplify details that won’t remain clear at the intended size.
Prepare colour and text for a physical print
Screens display colour using RGB light, while CMYK is the preferred colour mode in the supplied sticker artwork guidance for print. Colours can look different on paper than they do on screen, so don’t assume a screen preview guarantees an exact printed match. If you convert artwork from RGB, review it afterwards because some colours may shift in appearance.
Preparing sticker artwork means checking contrast and legibility after colour conversion or export, not only before it. Make sure text stands out from its background, particularly where the design uses similar shades or small lettering. Review the design at the intended sticker dimensions and check fine details, including thin lines, small symbols and close-set text.
- Check raster images at 300 dpi at the final printed size.
- Replace enlarged, blurry assets with original, higher-resolution files where possible.
- Review CMYK colour, contrast and small text after export.
A close-up view can help you spot flaws, but judge overall readability at the sticker’s actual size too. This gives you a clearer sense of how the finished design will look and helps catch details that disappear when reduced.
Export and proof the sticker artwork before sending it
Exporting the file isn’t the final check. A PDF can preserve a layout well, but it still needs to match the intended sticker size and remain clear when opened outside the design software. Check the exported file itself, not just the editable artwork you started with.
Export a file that preserves the intended layout
PDF is the preferred format for sticker artwork because it can keep the page dimensions and layout together in one file. JPG, JPEG, PNG, TIFF and ZIP are also accepted, but a supported file type isn’t automatically print-ready. Avoid using a screenshot instead of the final artwork: it may not preserve the correct dimensions or image quality.
Give the exported file a clear name so it’s easy to distinguish from drafts or alternate designs. If you’re sending several versions, identify the relevant design or size in each filename. Keep the final artwork separate from reference images, and include production notes with the order rather than relying on the filename alone.
Run a final proof check before handover
Open the exported file and inspect it at a useful zoom. Confirm that the layout hasn’t shifted, text remains readable and images look sharp. Then compare the production details with the artwork. This short preflight can catch common mismatches before you send the file:
- Confirm the page or artwork dimensions match the intended finished sticker size.
- Check the orientation and shape against the order details.
- Review margins and any bleed required for the specification.
- Inspect text, logos, fine lines and image quality at the intended output size.
- Check the exported file opens correctly and displays the complete design.
Pay particular attention to layouts that look correct in the design programme but change after export. Missing elements, clipped text or a blank page are easier to spot in the final file. If the sticker design has several versions, open each one and match it to its corresponding size or shape before sending.
For further information about the service, see the custom sticker and label printing contact page. Preparing sticker artwork carefully means checking the exported file as well as the design, so the size, shape and visible content all agree before production.
Send sticker artwork and order details for printing in London
A clear order brief helps match your file to the stickers you need. Send the final artwork with the production details, rather than relying on the design alone to explain the job. For custom sheet-based stickers and labels, state the size and shape of each sticker, as well as the total quantity required.
Give the print shop a clear, complete brief
Include the key details together so the artwork and instructions are easy to compare:
- Product type: sticker or label, with a short description of its intended use.
- Finished size and shape: give the dimensions of each sticker, not just the sheet, and name the intended shape.
- Quantity: state how many stickers or sheets you need.
- Material or finish: note your requested specification.
- Deadline: give the date and time you need the order, especially for an urgent job.
- Collection preference: say whether you intend to collect once the order is ready.
Attach the final print-ready artwork and make clear which file belongs to each size or shape. If the job has separate versions, label them consistently in both the filenames and order details. Include single- or double-sided instructions only where relevant. Add any finishing preferences that matter, making sure the brief describes the result you want.
Printbox London (Same Day Printing London) produces stickers and labels in custom sheet-based shapes and sizes. The Stickers & Labels service is a good fit when you need to supply artwork and specify how the finished sticker should be presented. A concise brief keeps the requested product, artwork and production details aligned.
Plan collection and timing without assuming a deadline
Same-day sticker printing is available for selected quantities and specifications. Turnaround depends on the order and production capacity, including its quantity, material, finishing, artwork readiness, stock and workload. Give your deadline clearly when placing the order so the required timing can be considered.
Customers across Greater London, including Central, North, East, South and West London, can use the Tottenham shop for collection. Printbox London (Same Day Printing London) serves customers in Haringey, Hackney, Islington, Camden, Enfield, Barnet, Westminster, Newham, Redbridge and Waltham Forest from its shop at 52 West Green Road. Wait until the order is confirmed ready before travelling to collect it. Keep the order details and any updates together so you can refer to the agreed size, quantity and collection preference.
Need sticker printing in London? Send Printbox London (Same Day Printing London) your finished artwork, order details and deadline through the contact page.
Get your sticker file ready for its next use
Once your artwork is prepared, keep a clearly named master copy for future orders or campaign updates. Save the approved version separately from working drafts, and note which design, size and shape it belongs to. This makes it easier to find the right file when you need to update wording, replace a logo or prepare another version.
Good file preparation also gives your brand a consistent starting point across packaging, promotions and other printed materials. Before sending a new job, compare the current artwork with the approved version and make sure any changes are intentional. A tidy handover helps everyone work from the same brief.
For a new sticker order, send the final file and relevant job details to Printbox London (Same Day Printing London). Same-day printing is available for selected quantities and specifications, with turnaround depending on the order.
With the right file in hand, you’re ready to take the next step.
Frequently Asked Questions
Is a PDF always ready to print as a sticker?
No. PDF is the preferred artwork format, but the file type alone doesn’t show which version you want printed. A PDF might contain several pages, a draft alongside a final design, or notes that aren’t part of the artwork. Identify the approved version and make production instructions clear in the order details, so there’s no guesswork about which design to use.
Can I use the same artwork for different sticker sizes?
You can use the same core design, but don’t assume one layout will suit every size unchanged. A compact version may need a different arrangement of the logo and wording from a larger one. Treat each requested size as a distinct version in your files and order details. This helps show which artwork belongs to each size and avoids applying the wrong layout to an order.
Can one sticker sheet include more than one design?
If your order involves several designs, list each one separately with its finished shape, size and requested quantity. Describe how you want the designs arranged on the sheet instead of relying on their position in a combined file to explain the request. This clarifies the number of designs, stickers and sheets required.
Should I add a white outline around my sticker design?
A white outline is a design choice, so include it only if you want it to appear around the printed image. It can create contrast against a colourful or detailed background, but may change the look of a logo or illustration. Check that the border is intentional around the whole design, including narrow corners and small details, and make it part of the artwork rather than a separate production instruction.
Does a transparent background mean the printed sticker will be transparent?
No. A transparent background in a digital file means the artwork has no visible colour in those areas; it doesn’t specify the physical appearance of the finished sticker. If the visual result depends on what shows through around the design, state that clearly in the order details. Don’t rely on a checkerboard transparency preview to communicate the intended result, as that pattern is only a display aid.
Can I send a logo saved from a website for sticker printing?
You can provide a website-saved logo, but check that it’s the correct approved version for your brand. Websites can display alternate logo colours, cropped marks or versions with a background. If your brand has several variations, identify the one you want used and state whether the background shown is intentional. This helps prevent an old or unintended web graphic being mistaken for your chosen artwork.
Article by
Printbox London Team
The Printbox London (Same Day Printing London) team provides practical printing guidance based on real customer requirements and day-to-day print production. We serve customers across Greater London from our Tottenham print shop, with same-day printing available for many products depending on quantity, specification, artwork and production capacity.