
Preparing Flyer Artwork: A Practical Print-Ready File Guide
Oct 01, 2026
What should you check before sending flyer artwork to print? Start with the finished size. Preparing flyer artwork at the wrong dimensions can affect the bleed, the position of your text and the final layout. Confirming the size before you export helps catch avoidable problems early.
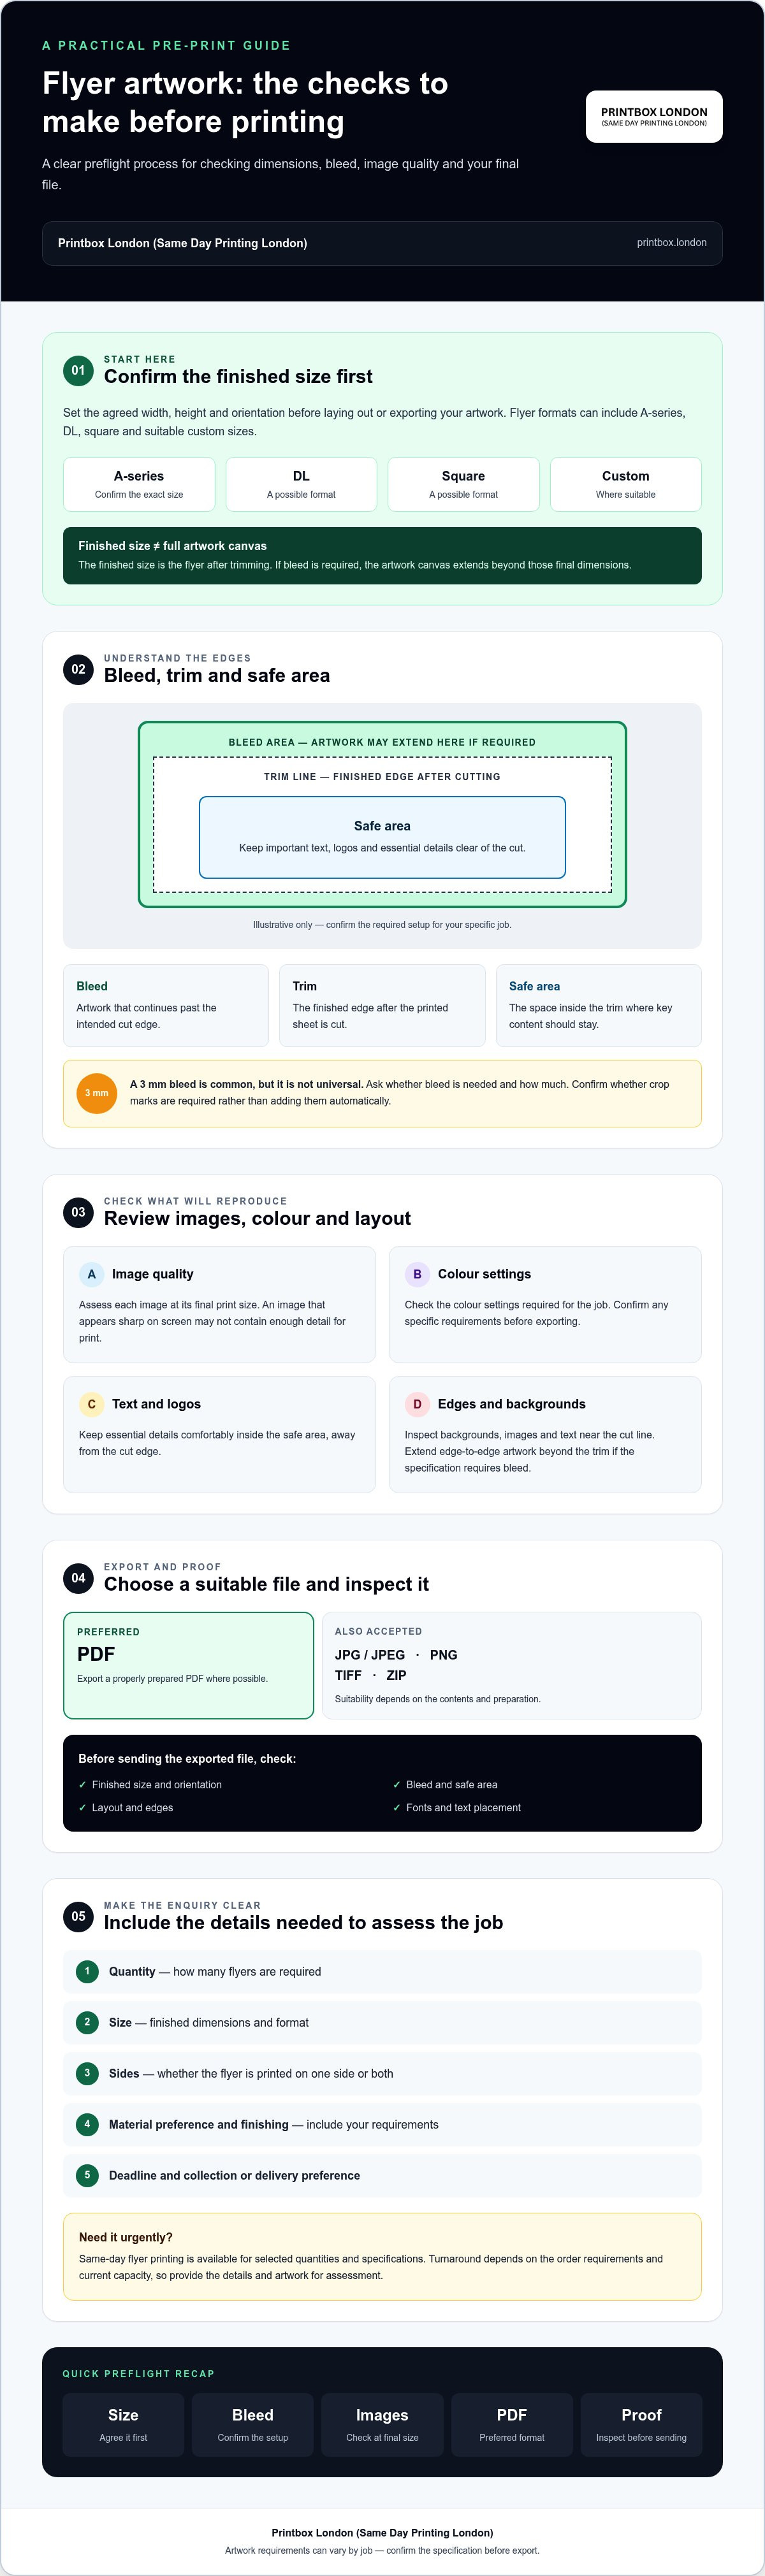
It’s easy to feel unsure about image resolution, colour settings and what a printer needs to check. This guide takes you through a practical process: set the agreed dimensions, check images at their final size, keep important content inside the safe area and proof the exported file. A 3 mm bleed is common, but requirements vary, so confirm what applies to your job.
You’ll also learn why PDF is usually the preferred format and which order details to include in your enquiry. Printbox London (Same Day Printing London) prefers PDF artwork and also accepts JPG/JPEG, PNG, TIFF and ZIP files. Same-day flyer printing is available for selected quantities and specifications, so a ready-to-check file and clear order details can help the team assess your request.
Key Takeaways
- Confirm the flyer’s finished size and format first. A-series, DL, square and suitable custom sizes can all be options.
- When preparing flyer artwork, check the required bleed and keep important text and logos safely inside the trim area.
- Assess image resolution at the final print size. An image that looks sharp on screen may not have enough detail for print.
- Export a properly prepared PDF where possible, then check the layout, fonts and edges in the exported file.
- Include the quantity, size, sides, material preference, finishing, deadline and collection or delivery preference in your print enquiry.
Preparing flyer artwork starts with the finished size
Confirm the flyer’s finished width, height and format before you design or export it. Flyer and leaflet formats can include A-series, DL, square and suitable custom sizes. The artwork should match the agreed print specification, with extra space added only where bleed is required.
Use this quick check before exporting:
- Confirm the size. Check the finished width, height and orientation with your printer.
- Check the bleed. Ask whether bleed is required and, if so, how much.
- Protect key content. Keep text, logos and essential details inside the safe area specified for the job.
- Inspect the canvas. If bleed is required, make sure the artwork extends beyond the trim size as instructed.
These checks are part of prepress, the preparation of artwork before printing. Prepress procedures can include technical checks to identify issues before production.
How to set the flyer’s finished dimensions
Set the final width and height in your design file before laying out text and images. The finished size is the flyer’s dimensions after trimming, not necessarily the full size of the artwork canvas. If bleed is required, the canvas extends beyond those final dimensions. Check the flyer and leaflet printing options, then confirm the exact specification for your job before exporting.
Clear dimensions also help the printer assess the artwork alongside the quantity and other job details. If you’re preparing flyer artwork for an urgent order, confirm the size early so that changes don’t hold up the enquiry. Same-day printing is available for selected quantities and specifications, subject to the order requirements and current capacity.
Bleed, trim and safe area in plain English
Bleed is artwork that extends past the intended cut edge. It helps prevent an unprinted sliver if the sheet shifts slightly during trimming. A 3 mm bleed is common, but it isn’t required for every job. Trim is the finished edge after the printed sheet has been cut. The safe area is the space inside that edge where important text and logos should stay clear of the cut.
Ask which bleed and safe-area settings apply to your flyer. Don’t assume a template or setting used for another job will work for this one. Printbox London (Same Day Printing London) can assess artwork against the job requirements. PDF is the preferred file format, and JPG/JPEG, PNG, TIFF and ZIP files may also be suitable depending on their contents and preparation.
Set bleed, margins and layout before exporting flyer artwork
Once the finished size is agreed, set up the edges before you export. This helps prevent a coloured border, image or key detail from being cut unexpectedly. Requirements differ by job, so confirm the bleed, safe area and crop-mark instructions for your flyer instead of relying on settings from another design.
Use this workflow:
- 1. Confirm the size. Check the agreed finished width, height and orientation.
- 2. Check the bleed. Ask whether artwork needs to extend beyond the trim line and by how much. A 3 mm bleed is common, but it isn’t universal.
- 3. Protect key content. Keep small text, logos and essential details inside the safe area specified for the job.
- 4. Inspect the edges. Review backgrounds, images and text that sit close to the cut line.
When flyer artwork needs bleed and crop marks
If a background colour or photograph should reach the edge of the finished flyer, it may need to continue beyond the trim line. That extra artwork is the bleed. Without it, slight movement during trimming could leave a narrow unprinted edge. The amount required depends on the print specification, so check before setting up or changing the file.
Crop marks show where the finished piece should be cut. Don’t add them automatically. First confirm whether they’re needed and how the file should be supplied. For more detail on the terms and setup, refer to a dedicated bleed-and-trim guide. The University of Texas at Austin also provides a practical print-ready file checklist for reviewing artwork before submission.
Keep text and key details clear of the trim
Keep phone numbers, web addresses, dates, calls to action and logos comfortably inside the safe area. Small text placed too close to the edge can be hard to read and may be vulnerable to trimming. Check the front and back separately, especially if either side has a border or elements close to the edges.
Before approving the file, view each side at its actual finished size. Check that backgrounds intended to reach the edge extend as instructed, while essential content stays clear of the cut. Reviewing the whole design at its final size can reveal spacing problems that are easy to miss when zoomed in.
Check flyer image quality and colour before sending the file
A picture can look crisp on your phone or laptop and still print softly. Screens display images with light, often at a smaller size than the printed flyer, so screen appearance alone doesn’t confirm that an image has enough detail. Check each image at the size it will appear in the finished design, particularly if you’ve enlarged or cropped it.
DPI describes how many dots of image detail are printed within each inch of the image’s final size. For raster images, 300 dpi at final size is a practical target. Confirm the requirements for your specific job, as resolution needs can depend on the print specification.
Check resolution at the flyer’s actual print size
Review images in the layout at their placed dimensions, not just by their original pixel dimensions or how sharp they seem when zoomed out. Enlarging a small image spreads its available detail over a larger area, which can make edges look jagged or blurred in print. A low-resolution screenshot can have the same problem.
If an image looks pixelated at its intended size, replace it with a higher-quality original where possible. Enlarging it further won’t restore detail that isn’t in the file.
Before export, scan the full design for elements that may lose quality in print:
- Photographs or logos that have been enlarged substantially.
- Images copied from a website or captured as screenshots.
- Small details that look indistinct at their final size.
- Colours that rely on looking especially bright on a screen.
Understand CMYK and RGB colour differences
RGB combines red, green and blue light to display colour on screens. CMYK uses cyan, magenta, yellow and black inks to reproduce colour in print. Because the two colour modes work differently, some bright screen colours may look less vivid on paper. Printed colours also won’t necessarily match a lit display exactly.
When preparing flyer artwork, set the colour mode according to the printer’s instructions. Printbox London (Same Day Printing London) recommends CMYK for raster images, but check the requirements for your file and job before exporting. A dedicated CMYK-versus-RGB guide can explain the difference in more detail.
Check image detail and colour in the exported file, not only in the design application. If anything looks unexpectedly soft or different, review the original image and export settings before sending the artwork.
Choose a suitable export format and proof the flyer PDF
PDF is the preferred format for flyer artwork when it’s correctly prepared, but choosing PDF alone doesn’t make a file print-ready. The dimensions, layout, image quality and other settings still need to match the agreed requirements. Preparing flyer artwork carefully means checking the exported file, not just trusting what appears on your design canvas.
Printbox London (Same Day Printing London) prefers PDF and also accepts JPG/JPEG, PNG, TIFF and ZIP files. Whether a particular file is suitable depends on its contents and preparation.
Export a print-ready PDF from your design software
Export at the agreed finished size and preserve the intended layout and page orientation. If the job requires bleed, make sure the file includes it as instructed. After export, open the PDF and check that fonts display correctly, images are present and positioned as intended, and no content has shifted or been clipped.
Don’t rely on a software preset without checking the job specification. Export options vary, and the right settings depend on the file and print requirements. Other accepted formats can also be suitable, but an image file or ZIP archive still needs to contain artwork that meets the agreed dimensions and quality requirements.
Proof every detail before approving the artwork
Give the exported file a final check before sending it. Read all copy carefully, then inspect the layout at the intended finished size. For a double-sided flyer, review both pages separately and confirm they’re in the right order and orientation.
- Check spelling, phone numbers, web addresses, dates and addresses.
- Confirm that offer details and calls to action are current and accurate.
- Verify the finished size, orientation and page layout.
- Look for missing, soft or misplaced images and unexpected font changes.
- Check that any required bleed is present and important content is clear of the trim.
- Review both sides, including their order and orientation.
An accepted file format doesn’t guarantee the artwork is ready to print. If you’re unsure about the file or the requirements for your flyer, ask before submitting it.
Send your flyer artwork and confirm the print requirements
A clear enquiry gives the printer the details needed to assess your flyer and artwork. Attach your current file, even if you’re not sure it’s fully print-ready. That gives the team a chance to identify questions before the job is confirmed.
What to include in a flyer print enquiry
When preparing flyer artwork for submission, send the key job details together rather than leaving the printer to guess. Include:
- Product and finished size: Say whether you need flyers or leaflets, and give the agreed dimensions and format.
- Quantity: State how many copies you need.
- Printing sides: Confirm whether the flyer is single-sided or double-sided.
- Material and finishing preferences: Describe what you have in mind, if applicable, so suitability and availability can be checked.
- Deadline: Give the date and time you need the order, so the printer can confirm what’s possible.
- Collection or delivery preference: Say how you’d like to receive the order, then confirm the available arrangements.
- Artwork: Attach the final file and mention any specific requirements you’d like checked.
PDF is the preferred artwork format for Printbox London (Same Day Printing London). Other formats may be accepted, but the file still needs to meet the agreed specification.
Confirm the deadline and fulfilment details
Same-day flyer printing is available for selected quantities and specifications. Turnaround depends on the order, including its quantity, size, material, finishing, artwork readiness, stock and production workload. Share your required deadline early and wait for confirmation before making plans around it.
Include your collection or delivery preference in the enquiry, then confirm the available options for your job rather than assuming a particular arrangement or timing. If the artwork needs changes or the specification is undecided, mention that too. A clear enquiry helps establish what’s needed to assess the file and current production capacity.
Printbox London (Same Day Printing London) serves customers across Greater London, including Central London, North London, East London, South London and West London, as well as Haringey, Hackney, Islington, Camden, Enfield, Barnet, Westminster, Newham, Redbridge and Waltham Forest. Its shop is at 52 West Green Road, South Tottenham, London N15 5NR. Before sending an urgent job, make sure the attached file is the final version and the order details match the artwork. The team can confirm whether the file is suitable and whether current capacity matches your quantity and specification.
Get your flyer file ready to print
Preparing flyer artwork is more straightforward when you confirm the finished size first, then check bleed, safe area, image quality and colour settings against the job requirements. Proof the exported file carefully too. PDF is the preferred format, but it still needs to match the agreed specification.
Flyers and leaflets can be produced in A-series, DL, square and suitable custom sizes. Include your chosen size, quantity, printing sides, material preference and required deadline when you enquire. Same-day printing is available for selected quantities and specifications, with turnaround depending on your order details and current capacity.
Have your artwork ready but aren’t sure whether it’s suitable? Contact Printbox London (Same Day Printing London) to check the file requirements before proceeding.
Once you’ve checked the size, layout and exported file, you’ll have the information you need to make a clear print enquiry.
Frequently Asked Questions About Flyer Artwork
What is the best file format for preparing flyer artwork?
A correctly prepared PDF is the preferred format for preparing flyer artwork. Printbox London (Same Day Printing London) also accepts JPG/JPEG, PNG, TIFF and ZIP files, but suitability depends on the file and job. Check the exported artwork for the agreed dimensions, layout, image quality and any required bleed. An accepted format makes submission possible, but doesn’t automatically make the artwork print-ready.
How much bleed should I add to flyer artwork?
A 3 mm bleed is common, but it isn’t a universal requirement for every flyer. Bleed is artwork that extends beyond the finished trim edge, often needed where a background colour or image should reach the flyer’s edge. Confirm the required amount with your printer before exporting. Keep important text and logos inside the safe area specified for your job.
Can I send a Canva file for flyer printing?
You can create flyer artwork in Canva, but check how the file should be supplied before sending it. PDF is the preferred format for Printbox London (Same Day Printing London). Export your design to PDF where appropriate, then inspect the file for size, layout, images and any required bleed. Don’t assume a Canva design is print-ready simply because it looks correct in the editor. Confirm that the file suits your specification.
What resolution should images be for printed flyers?
Aim for raster images at 300 dpi at their final printed size, while checking the requirements for your specific job. DPI describes image detail in relation to the dimensions at which it will be printed. A small image enlarged to fill a large area may appear pixelated, even if it looks sharp on screen. Check each image at its placed size and replace visibly soft or low-resolution images where possible.
Should flyer artwork be in CMYK or RGB?
CMYK is recommended for raster images supplied for flyer printing. RGB combines red, green and blue light to display colours on screens; CMYK uses cyan, magenta, yellow and black inks for print. Colours may look different on paper than on a lit display, so an exact screen-to-print match isn’t assured. Confirm the colour requirements for your file before exporting.
Can flyers have DL, square or custom dimensions?
Yes. Flyer and leaflet formats can include A-series, DL, square and suitable custom dimensions. Confirm the finished width and height with your printer before designing, so the artwork matches the agreed specification. Printbox London (Same Day Printing London) can assess suitable sizes for the job. For a custom format, check any related layout, bleed and safe-area requirements before exporting the final file.
Can I get flyers printed the same day in London?
Same-day flyer printing is available for selected quantities and specifications. Turnaround depends on the order, including quantity, size, material, finishing, artwork readiness, stock and production workload, so confirm availability before relying on a deadline. Printbox London (Same Day Printing London) serves customers across Greater London. Share your deadline and job details to check whether current capacity suits your order.
What information should I send with my flyer artwork?
Send the flyer’s finished size, quantity and whether it’s single-sided or double-sided. Include your material or finish preference, any finishing requirements, deadline and collection or delivery preference. Attach the final artwork file and mention any questions about its suitability. These details help Printbox London (Same Day Printing London) assess the job and confirm the requirements and available turnaround.
Article by
Printbox London Team
The Printbox London (Same Day Printing London) team provides practical printing guidance based on real customer requirements and day-to-day print production. We serve customers across Greater London from our Tottenham print shop, with same-day printing available for many products depending on quantity, specification, artwork and production capacity.